Bringing your HomeWizard Energy Socket into your Homey setup is a real game-changer. It’s the difference between just watching your energy use and actively controlling it. This setup turns detailed energy data into a powerful tool for smart home automation, all orchestrated by your Homey hub.
Why Connect Your HomeWizard Socket to Homey
The standalone HomeWizard Energy app is great for what it does—it gives you a clear picture of your energy consumption. But it’s mostly a one-way street; it reports, you react. When you link the Energy Socket with Homey, the whole dynamic changes.
Homey acts as the central command for your entire smart home. It takes the live data from the socket and uses it to trigger intelligent, automated actions. This is how you shift from passive monitoring to proactive energy management, making a single device far more powerful. You can explore more about the role of these central controllers in our guide on smart home hubs.
It’s where the real magic happens. You go from simply seeing that an appliance is drawing a lot of power to automatically telling Homey to shut it down during peak electricity pricing.
To put it in perspective, here's a quick look at what you gain by making this connection.
Standalone HomeWizard App vs Homey Integration
| Feature | HomeWizard App (Standalone) | Homey Integration |
|---|---|---|
| Energy Monitoring | Real-time and historical data viewing. | Full access to real-time and historical data within Homey. |
| Automation Triggers | Limited to notifications and basic app functions. | Use energy consumption, solar surplus, or tariff changes as triggers for complex, multi-device automations. |
| Device Control | Manually toggle the socket on/off from the app. | Automatically control the socket and any other connected device based on energy data (e.g., turn on lights). |
| Conditional Logic | Not available. | Create intricate 'If-And-Then' scenarios (e.g., if solar is high and it's after 12 PM, then start charging). |
| Ecosystem Integration | Works within the HomeWizard ecosystem. | Connects the socket's data to thousands of devices from hundreds of brands supported by Homey. |
This table really highlights how Homey expands the socket's capabilities, turning it from a simple meter into an integral part of a much smarter, more responsive home.
Unlocking Advanced Automation Scenarios
Think about the practical things you can suddenly do with Homey Flows. These aren't just hypotheticals; I've seen people set these up in their own homes:
- Solar Power Optimisation: Set up a flow to run the washing machine, dishwasher, or charge your e-bike only when your solar panels are producing more energy than your house is using. Homey checks your solar generation, sees the surplus, and then activates the socket to take advantage of that free, green power.
- Dynamic Tariff Response: If you're on a dynamic energy tariff, this is huge. Homey can automatically pause high-draw appliances like a tumble dryer or water heater the moment the price per kilowatt-hour spikes, then resume them when prices drop.
- Standby Power Elimination: Create a simple "Goodnight" routine. Homey can check which Energy Sockets are drawing a small amount of standby power (say, between 1W and 5W) and then shut them down completely for the night. No more vampire drain.
The core benefit here is synergy. The HomeWizard Energy Socket provides the precise, real-time data, and Homey provides the powerful logic engine to act on it across your entire smart home.
This push towards integrated, energy-conscious homes is only getting bigger. The Netherlands Smart Home market, which includes devices just like the HomeWizard socket, was valued at roughly USD 1.25 billion in 2023 and is expected to hit USD 5.10 billion by 2030. This isn't just a niche hobby anymore; it reflects a real demand for the kind of smart, efficient living this Homey integration provides. To get a better handle on the broader concepts at play here, it’s worth understanding what is systems integration.
Your Pre-Flight Checklist for a Smooth Setup
Before we get into building the dashboard, let's do a little prep work. Taking a few moments to get your hardware and software sorted out first will save you from the usual connection headaches later on. Think of it as making sure your Energy Socket HomeWizard and Homey Pro are properly introduced.
This isn’t just about having the right devices; it’s about ensuring they can actually talk to each other. For that to happen, they both need to be on the same Wi-Fi network. It's that simple.
Gathering Your Core Components
First up, let’s run through the gear you'll need. This whole setup hinges on a local connection, so a solid home network is absolutely non-negotiable.
Here’s the essential kit:
- A Homey Pro: This is the central hub of your smart home, the device that will process all the data from the socket and run your automations.
- The HomeWizard Energy Socket: This is our star player. It's a smart plug that measures the real-time energy consumption of any appliance you plug into it.
- A Stable 2.4 GHz Wi-Fi Network: This one's important. The Energy Socket, like a lot of smart home gadgets, only works on the 2.4 GHz Wi-Fi band. Make sure your router is putting out a strong, reliable signal on this frequency for consistent data.
I’ve found that temporarily switching off your router's 5 GHz band during the initial setup can sometimes make life easier. It just prevents your phone from getting confused and trying to connect to the wrong network.
Installing the Essential Software Bridge
Once your hardware is ready to go, the next piece of the puzzle is the software that lets Homey and the socket communicate. The official HomeWizard app doesn't talk directly to Homey Pro, but luckily, a community developer has built the perfect solution.
The magic happens thanks to the "HomeWizard Energy" app, which you'll need to install from the Homey Community Store (HCS). This app is the crucial link that allows your Homey to find and read data from the Energy Socket over your local network.
To get ready for the pairing process, you'll need one more thing: the local IP address of your Energy Socket. An IP address is basically a unique home address for a device on your network. The easiest way to find it is usually by logging into your router's admin dashboard or by using a simple network scanning app on your smartphone.
Jot that IP address down—you’re going to need it in a moment to tell Homey exactly where to look for your new socket.
Pairing Your Energy Socket with Homey Pro
With all the bits and pieces in place, it's time to get your Energy Socket talking to your Homey Pro. This is where we make the magic happen, establishing a direct connection between them over your local network. The process is pretty straightforward, but it hinges on one crucial step: unlocking the local data stream inside the HomeWizard Energy app.
We'll run through enabling this local connection, searching for the socket in Homey, and getting everything finalised. Think of it less like a simple pairing and more like giving Homey a private, high-speed line straight to the socket's energy data. This ensures you get the fastest and most reliable updates possible.
Enabling the Local API in the HomeWizard App
First things first, Homey can't see your socket until you give the socket permission to share its data locally. This is a built-in security feature in the HomeWizard ecosystem, and thankfully, it's just a simple toggle switch in the HomeWizard Energy app.
Grab your phone and open the app. Head over to Settings, tap on Meters, and then pick your Energy Socket from the list. In that menu, you'll spot an option called Local API. You need to flick that switch to enable it. This simple action makes the socket visible to other devices on your Wi-Fi network—most importantly, your Homey Pro.
Don't skip this. Without the local API activated, Homey simply won't be able to find or communicate with your socket, and you'll be left wondering why nothing is working.
The infographic below gives a great overview of the physical installation, which you should have already completed before diving into the app side of things.
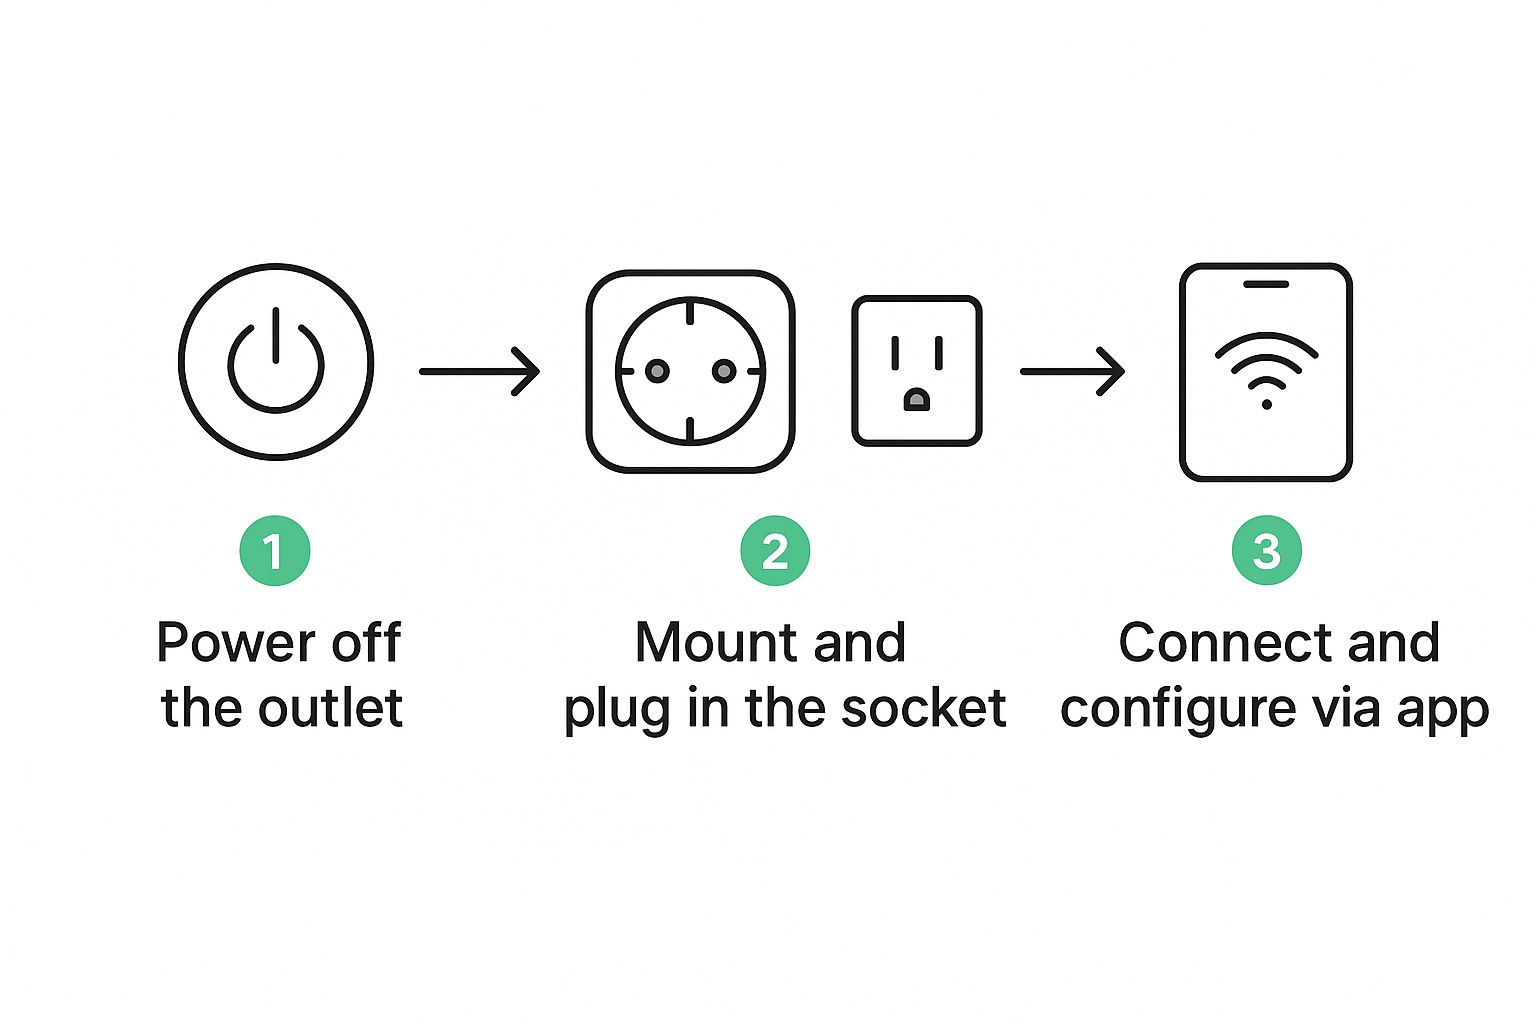
As you can see, it’s a simple process: prioritise safety, connect the hardware, and then move on to the software. Following these stages ensures a smooth and trouble-free start.
Adding the Device in Homey
Right, with the API now active, it's time to jump back into the Homey app.
Navigate to the Devices tab and hit the little plus icon (+) in the top-right corner to add a new device. You'll be shown a list of brands; just search for and select the HomeWizard Energy app you installed earlier.
Homey will then show you a list of compatible devices. Go ahead and select Energy Socket. At this point, Homey will start scanning your network, looking for any sockets that have their local API enabled.
A Quick Tip from Experience: Sometimes, for whatever reason, Homey might not find the socket automatically. Don't panic. The app will prompt you with an option to add the device manually by entering its IP address. This is why we noted it down earlier! In my experience, this direct connection method is often the most stable anyway.
The Energy Socket itself is a seriously impressive bit of kit for its price of around €33.95. It's designed to pull data every single second and stores that information for up to 12 months. That's a huge leap from standard smart meters that might only ping an update every 15 minutes and often with a day's delay. You can find more details on the full range of HomeWizard's energy monitoring products on their website.
Once Homey finds and adds your socket, you’re on the home stretch. Assign it to a room and give it a descriptive name—something like "Washing Machine" or "Office Power" makes it much easier to identify later when you start building dashboards and Flows. And that's it! Your Energy Socket integration is now live and feeding data directly into Homey.
Crafting Your Custom Energy Dashboard
Alright, now that your HomeWizard Energy Socket is happily talking to Homey and sending data, it's time for the fun part: making that data easy to read and genuinely useful. Raw numbers are great, but a well-thought-out dashboard transforms that flood of information into a clear command centre for your home's energy use. This is precisely where a tool like HDashboards comes into its own.
We’re going to step beyond the standard device list you see in the Homey app and build a custom, visually engaging energy monitoring view. This means adding your new socket to a dashboard, hand-picking the data you want to see, and tweaking the appearance to make it both practical and easy on the eyes.
Adding and Configuring Your First Tile
The core of any HDashboard is the "tile." Think of each tile as a small window into one of your devices or a specific piece of information it provides. Let's get our hands dirty and add a tile for your HomeWizard Energy Socket.
First, open up your HDashboard and pop it into edit mode. Pick an empty spot where you want the new tile to live and tap the plus icon. You'll see a list of all your Homey devices; go ahead and select the Energy Socket you just set up.
Now for the crucial step: choosing what information the tile should display. You'll be presented with a few options, but for energy monitoring, two are absolutely key:
- Actual Power (W): This is your live, real-time consumption in watts. It’s perfect for seeing exactly how much juice an appliance is pulling right now.
- Total Power (kWh): This shows the accumulated energy usage over time, measured in kilowatt-hours. This is the number that directly relates to what you see on your electricity bill.
For a great starting point, create two separate tiles—one for each of these capabilities. This setup gives you a brilliant at-a-glance view of both the immediate power draw and the long-term consumption. If you're curious about how different dashboard tools stack up, you might find our breakdown of Homey Dashboards vs HDashboards insightful.
Taking Tile Customisation to the Next Level
This is where you can really start to tailor the dashboard to your needs. A simple number is fine, but HDashboards lets you create much more dynamic and informative visuals.
One of the most effective changes you can make is switching up a tile's appearance. Try selecting your 'Actual Power' tile and changing its type to a graph. Just like that, you've turned a static number into a live chart that maps out consumption trends. It suddenly becomes effortless to spot those little spikes when the fridge kicks in or to see the baseline usage overnight.
Another fantastic trick is to make the tiles change colour dynamically based on what they're reporting.
A personal favourite is setting up the 'Actual Power' tile to change colour based on its value. For example, you could have it show green when power draw is under 50W, shift to yellow between 50W and 500W, and glow an urgent red when it jumps above 500W. This gives you an instant visual cue that something is pulling a lot of power, long before you even read the number.
Finally, don't overlook the layout itself. HDashboards has a flexible grid, so you can drag, drop, and resize tiles to your heart's content. I often make my 'Actual Power' graph tile wider to get a better view of the day's history, while keeping the 'Total Power' tile as a neat, compact square. A logical arrangement is what turns a random collection of data points into a truly intuitive energy overview.
Getting Practical with Energy-Saving Automations
Having a dashboard to visualise your data is great, but the real magic happens when you start building automations in Homey. This is where you can truly leverage the energy socket homewizard integration to make your home work for you, proactively cutting down your energy consumption without you having to lift a finger.
We're going to dive into the world of Homey Flows to set up some automations that go way beyond simple monitoring. Here are three practical ideas I've used myself that you can set up today to start saving energy and make your home a bit smarter.
Create a High Consumption Alert
We've all done it—left an appliance running by accident and only realised hours later. This simple Flow acts as a helpful watchdog, letting you know if something is drawing an unusual amount of power for too long. It’s perfect for things like a tumble dryer or a portable heater.
Here’s the basic logic to build this in Homey:
- When… The 'Actual Power' of your Energy Socket changes.
- And… The 'Actual Power' is greater than 1500W. (You can adjust this, but it’s a good starting point for a high-draw appliance).
- And… This condition stays true for 5 minutes.
- Then… Send a push notification to your phone that says, "Hey, the tumble dryer has been running at high power for 5 minutes."
The five-minute delay is key here. It stops you from getting annoying alerts every time an appliance has a brief power spike, like when a kettle boils. You only get notified when it's genuinely been left on.
Build a Solar Surplus Optimiser
If you've got solar panels, this Flow is an absolute game-changer. Instead of just sending all that lovely, self-generated electricity back to the grid for pennies, this automation puts it to good use right in your own home. A classic example is automatically charging your e-bike battery only when you have excess solar power.
The setup for this is beautifully simple:
- When… Your solar panel production changes.
- And… The 'Solar Production' is greater than your 'Total Home Consumption' by 200W.
- Then… Turn on the Energy Socket connected to your battery charger.
Of course, you'll want a second, corresponding Flow that turns the socket off again when you start importing power from the grid. Automations like these are fantastic tools for maximising your self-consumption and are a big part of exploring other energy-saving strategies.
This whole concept of using live data to intelligently control devices is really taking off. We're seeing more and more smart plugs being adopted here in the Netherlands, mainly because people are so keen on efficiency. When you have that real-time data from Homey, you can control big energy users like heating systems with incredible precision, making these automations super effective.
Implement a "Standby Killer" Flow
Did you know that many of your electronics are quietly sipping electricity even when they're turned "off"? It’s often called vampire or standby power, and it can really add up. This Flow tackles that waste head-on by automatically cutting the power to non-essential devices while you sleep. Think of your entertainment centre or home office setup.
You can even take this a step further and combine it with optimising your heating, a topic we dive into in our guide on thermostatic radiator valves on underfloor heating.
Here’s how you can build it:
- When… The time is 2:00 AM.
- And… The 'Actual Power' from the Energy Socket is between 1W and 8W (a typical standby range).
- Then… Turn the Energy Socket off.
This Flow is smart because it only acts when it detects that low standby power draw. It won’t accidentally switch things off if you happen to be up late watching a film. It’s a small tweak, but over the course of a year, the savings from eliminating that phantom load will definitely show up on your electricity bill.
A Few Common Questions and Troubleshooting Tips
Even with a straightforward setup, a few questions might pop up as you start living with your new energy socket homewizard integration. Let’s tackle some of the most common ones I hear, which should help you iron out any wrinkles and really get the most from your Homey setup.
Most of the time, any issues you run into are small and usually boil down to network connectivity, but knowing how the devices talk to each other makes troubleshooting a lot easier.
Can I See Historical Energy Data On My Hdashboard?
You absolutely can. While Homey's own Insights feature is your go-to for really digging deep into long-term data, HDashboards is fantastic for getting that "at-a-glance" view of recent trends.
All you have to do is tweak your Energy Socket tile's configuration to display a graph instead of a single number. This gives you a great visual history of the past few hours or days, right on your dashboard. If you're a real data-hoarder and want to keep logs for longer than Homey's standard retention period, there are some great community-built apps that can export your Insights data to external services for serious long-term analysis.
What Happens If My Homewizard Energy Socket Loses Its Wi-Fi Connection?
If the socket drops off your Wi-Fi, the data feed to Homey will, of course, stop. You'll see the device marked as 'unreachable' inside the Homey app, and it will probably be greyed out on your HDashboard.
The real impact here is that any Homey Flows that rely on the socket's real-time energy data won't be able to trigger. The good news is, as soon as its Wi-Fi connection is back, the socket will automatically reconnect to your network and start sending data to Homey again. No need to do anything manually.
This just highlights how important a stable Wi-Fi network is for a reliable smart home. The local communication is solid, but it needs that network foundation to work.
Do I Need The Homewizard Subscription To Use The Socket With Homey?
Nope! You don't need the paid HomeWizard subscription at all to make this work. The entire integration we've built here is based on the socket's local API, which is a standard feature and completely free to use.
This "local-first" approach is honestly one of the biggest selling points of this combination. It means Homey is talking directly to the socket over your own network. This gives you fast, private, and dependable data updates without ever having to rely on an external cloud service.
Ready to turn all that energy data into a powerful, interactive command centre? With HDashboards, you can build stunning, custom dashboards that truly bring your Homey devices to life. Grab a free trial and see what you can create. Explore HDashboards today!
Danny on
Open beta (v0.9.2)